The "What, Why and How" Guide To Dynamic Content Boxes
The world of marketing has experienced a paradigm shift. Years ago it was standard practice to send out a generalized offer or email newsletter to your whole subscriber list. How things have changed…now subscribers not only want tailored content based on their interests, they expect it. In a recent study by The Aberdeen Group, if you fail to personalize the content you send, your click through rates go down by about 14% and your conversion rates drop by 10% or more.
Personalizing your email campaigns makes total sense, but it doesn’t always take priority when faced with real world, “I need it by yesterday” deadlines. So what’s the solution? What can save marketers both time AND offer a means to provide the personalized content subscribers crave. The answer can be found in two little words that contain a ton of email marketing power – Dynamic Content.
Are you familiar with what dynamic content is and how it’s used email marketing? If not, you’re a part of a large majority of email marketers. I’m sure you’ve received emails before that have used dynamic content but most likely, you were unaware of their use.
Since many marketers may be unclear of exactly what a dynamic content is, this article will provide some clarification and pair it with visuals so you can really grasp the idea of why marketers would want to include it in their email marketing strategy and the reason it boosts click through and conversion rates.
What is Dynamic Content?
Dynamic content is a box of personalized content based on specific customer data that is included into an email campaign with a dynamic content tag. Dynamic content can be created from information pulled from buyer personas, email list preferences, gender, location, etc. In a sense, including dynamic content in email campaign is comparable to using custom fields, yet dynamic content provides you with much more flexibility because the boxes of content can include images, text and links. Going forward, I will refer to dynamic content as “dynamic content blocks.”
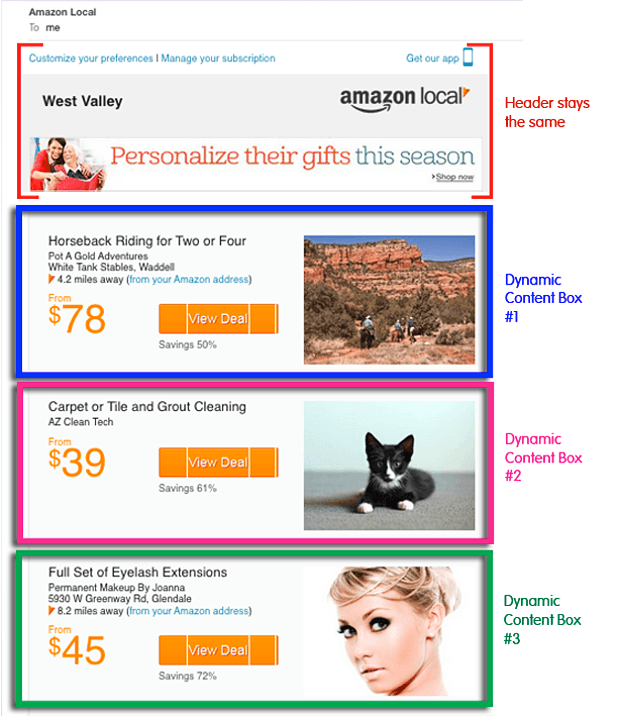
To illustrate how a dynamic content box works, I’m going to use an email from Amazon Local. Their dynamic content boxes are created with subscriber category preferences in mind – Amazon Local has a total of four.
- Entertainment & Travel
- Health & Beauty
- Shopping & Services
- Restaurants, Bars & Pubs
Based on the category (or categories) a subscriber selects, Amazon Local will include the corresponding dynamic contact box into their email. The email below was sent to a person who only selected three of Amazon Local’s categories:
- Entertainment & Travel (Dynamic Content Box #1)
- Shopping & Services (Dynamic Content Box #2)
- Health & Beauty (Dynamic Content Box #3)
In the second example below, the email was sent to a person who only selected only two of Amazon Local’s categories:
- Entertainment & Travel (Dynamic Content Box #1)
- Health & Beauty (Dynamic Content Box #3)

Both email samples above are from the same campaign, but each contains different content boxes based on the subscribers’ preferences. The header and footer (footer not shown in the samples) stay the same in both emails.
Why Use Dynamic Content Boxes?
Most marketers use dynamic content boxes to:
a) Save time
b) Provide customized content and/or call-to-actions to their subscribers without bombarding them with multiple emails.
To give you an example…
Let’s say you’re the marketing manager at a company that provides different services and solutions. You have a small marketing department, but a large email subscriber base. You currently have five different subscriber lists, each established around different interests. For each specific list, you create a monthly email marketing campaign. In most cases, subscribers are on multiple lists – or possibly on all of them. Therefore, they receive a separate email campaign for each of their interests. This may be acceptable if a subscriber is only on two of your email lists, but if they are on more than that, there’s s a high risk of opt-out. After all, the main reason people “unsubscribe” from email is because they receive too many campaigns.
Rather than sending out five different email campaigns each month, you can create one campaign that includes five dynamic content tags (each tag contains a box of information). This will dramatically cut down the time of creating those five emails, and your subscribers will appreciate getting all of their desired content in one email.
This all sounds good, right? Now are you wondering how you can start using dynamic content boxes in your next email campaign? If you're a Pinpointe customer, you’re in luck because dynamic content is a feature already available to you. If your not a Pinpointe customer, you can try this feature for free for 15 days by signing up for a “no strings attached” trial Pinpointe account (no credit card required).
How to Use Dynamic Content Boxes
First things first…
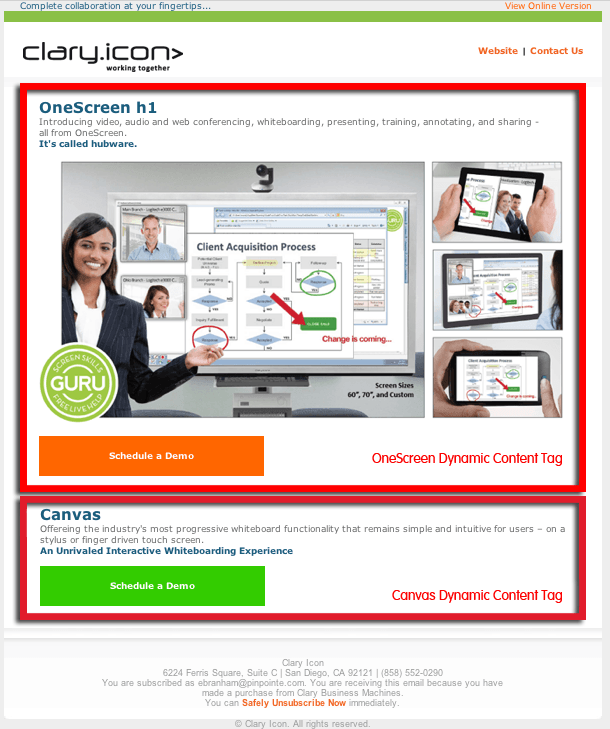
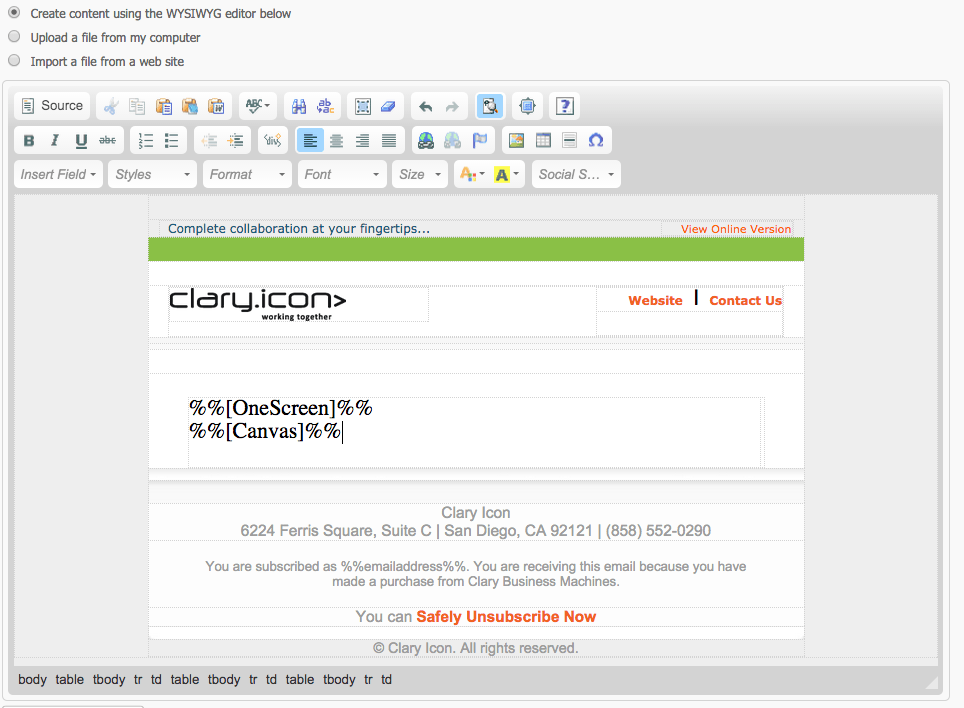
I’m going to show you how to create and insert dynamic content tags, which contain dynamic content boxes, in the email below (I use two). By following the steps I cover, you will be able to create your own email campaign with as many dynamic content boxes you choose.
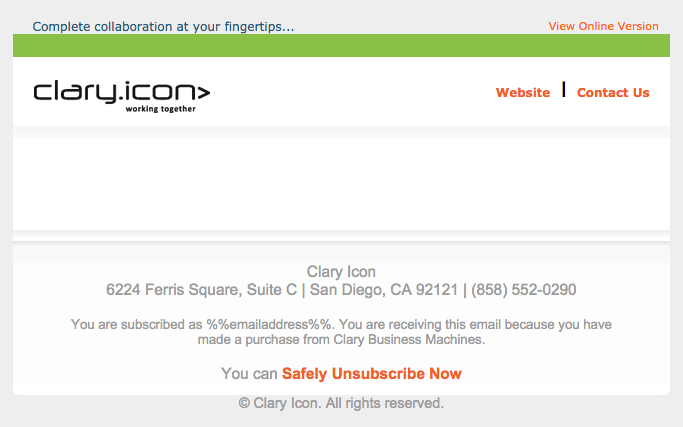
I just want to note that prior to creating my dynamic content boxes, I made an email template in which I will insert the dynamic content boxes. The empty space is where those boxes of information will go. See email template below.
Besides having your email template ready, you need to set up a custom field(s) of data, which defines who will be able to see each box of dynamic content when they receive your email campaign. This part may get a bit confusing, so I’ll walk you through it.
In the email I am creating, I have two separate dynamic content tags. One is for subscribers who are interested in OneScreen and the other is for subscribers who want information on Canvas. Therefore I have to set up two custom fields in my Pinpointe account with checkboxes that contain a YES and NO. If a subscriber clicks the YES checkbox next to OneScreen, they will get the information in the OneScreen dynamic content box – same rules apply for Canvas.
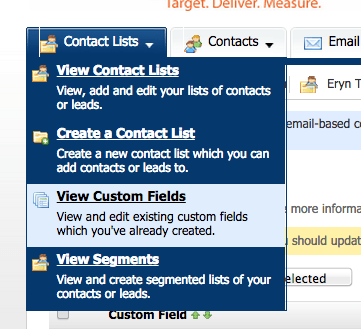
To set this up, make sure you are logged into your Pinpointe account then go to Contact Lists > View Custom Fields (then click)
A new screen will pop up. Click on the Create a Custom Field button.
Next, select the raidio button Checkboxes and type in the name of your custom field. I named mine "Interest-OneScreen."
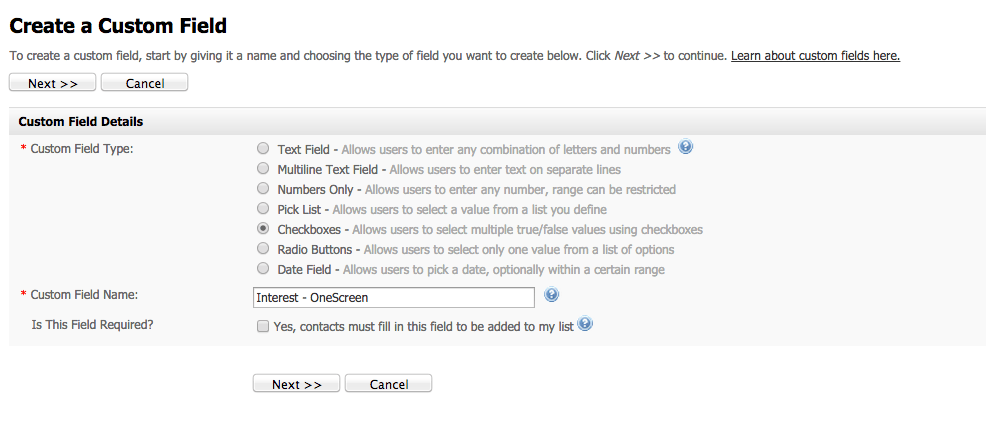
Click the Next >> button.
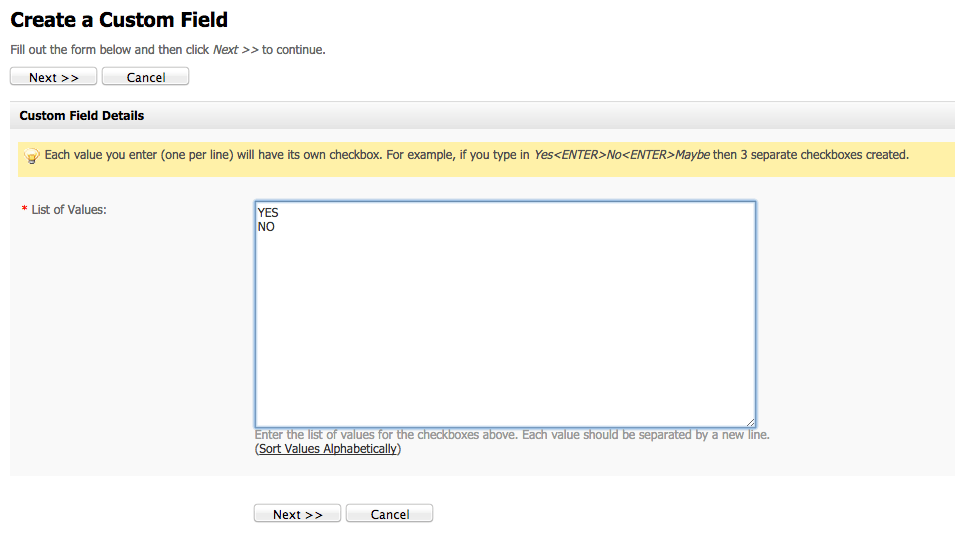
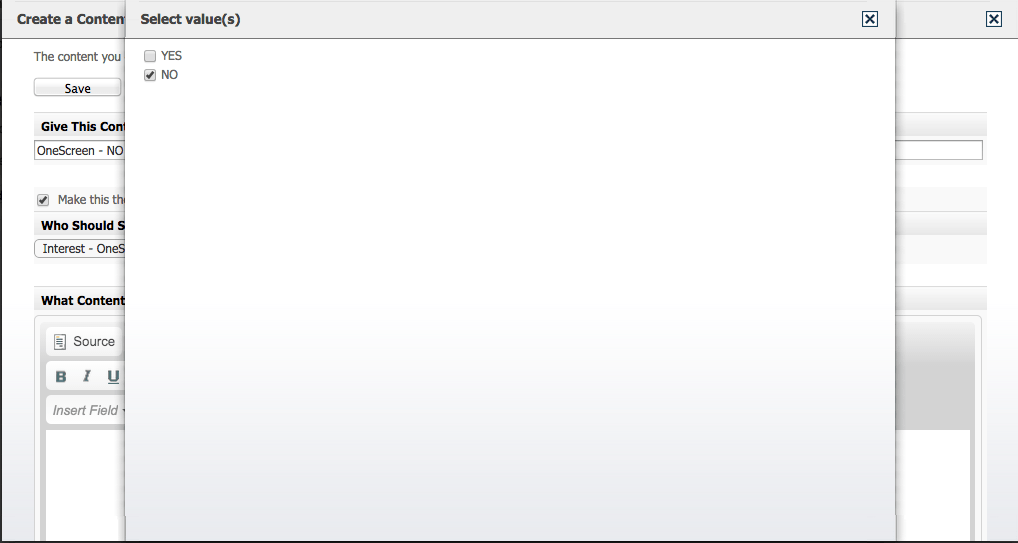
In the List of Values box, type in "YES" (hit enter) and "NO" > Click the Next >> button.
Now select the contact list or lists you want this field to be active in (this will be the lists you are sending your email to) > click on the Save button.
Repeat the steps above for each interest. In my case, I just set up one more custom field, which I called “Interest – Canvas.”

Now that you have the groundwork laid, you can create the dynamic content boxes that will be inserted into your email.
How to Create a Dynamic Content Box
For each dynamic content tag, you are going to create two dynamic content boxes. One will be blank (this will be your default box) and one will have the data in it.
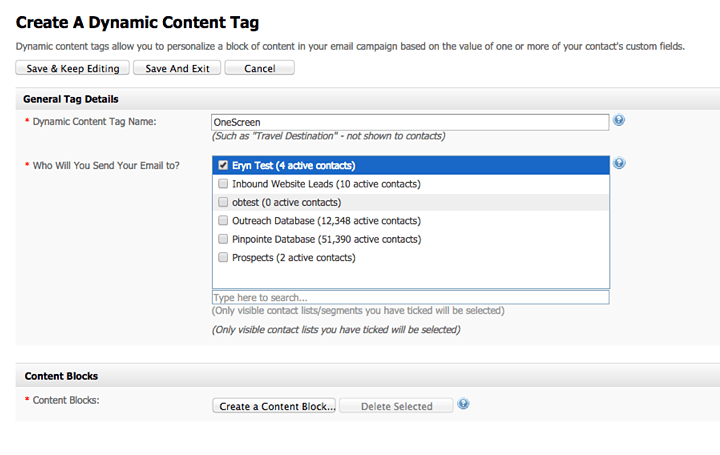
To get started, go to Email Campaigns > Dynamic Content Tags. Then click on the button Create a Dynamic Content Tag…

Enter a Dynamic Content Tag Name (I’m calling my first tag “OneScreen”) > select which list, or lists this will apply to > then click the Create a Content Block… button at the bottom of the screen to continue.
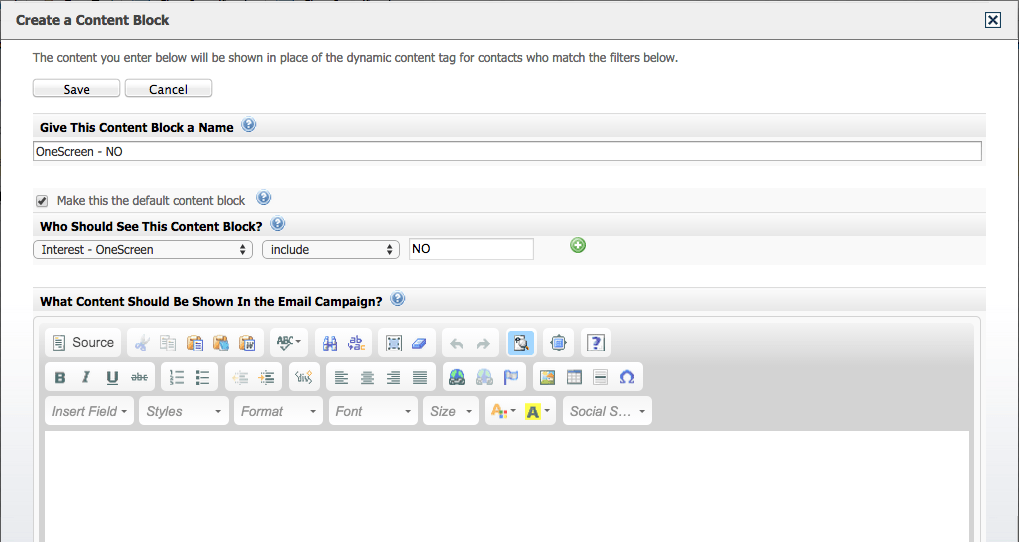
The first block you create is going to be your default block – it will contain no visual data. The reason is because anyone who doesn’t select YES to the "OneScreen Interest" custom field I created earlier (or the interest you created), will not see this block of information.
Name your content block accordingly. I’m going to name mine “OneScreen – No.” This is the default box, so I’m going to check that box off. Under Who Should See This Content Block? select the custom field you created – include – NO. Be sure to put no content in the box underneath “What Content Should Be Shown In The Email Campaign?” Click Save.
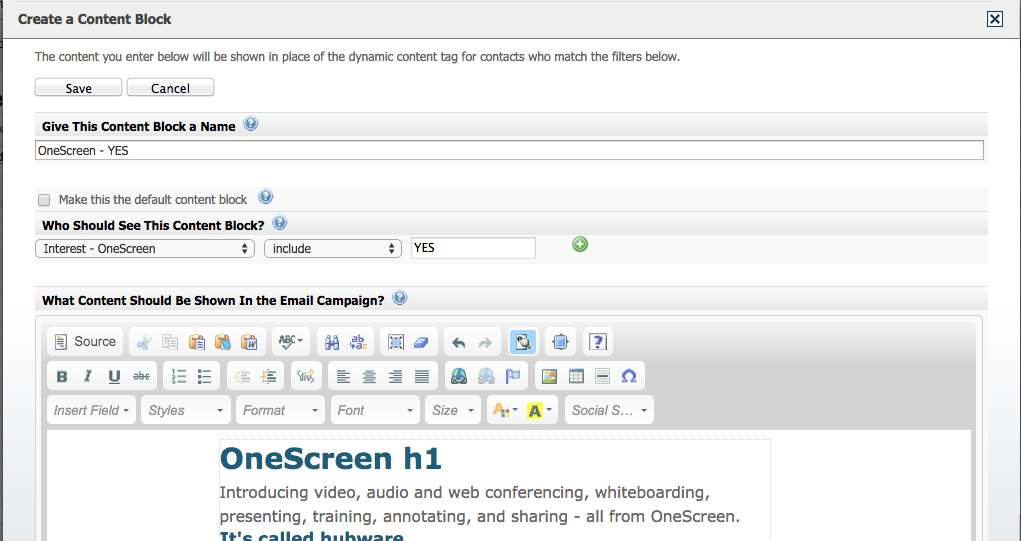
Now you want to create the content box for those who have an interest in seeing it.
In the same screen, scroll down and then hit the Create A Content Box… button. Once again name your content block accordingly. I’m going to name this one “OneScreen – Yes.” Ensure the default box is not selected. Under Who Should See This Content Block? select the custom field you created – include – YES. Now insert your content in the campaign editor box underneath What Content Should Be Shown In The Email Campaign? When you’re done, click save.
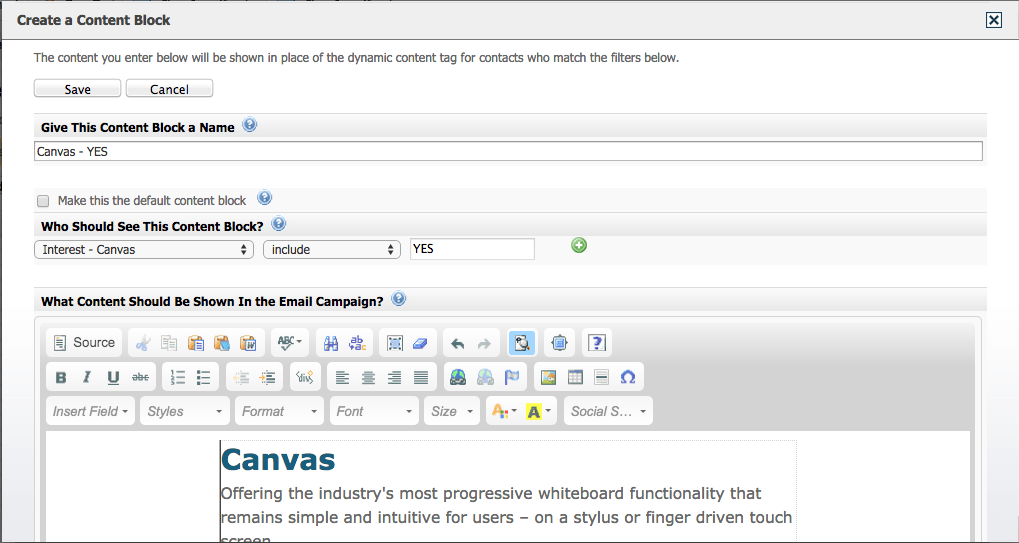
Repeat these steps for each dynamic content tag you have in your email. I only have one more (Canvas), so I will repeat these steps for the dynamic content related to Canvas.
Now that you have created your dynamic content boxes, you need to insert them into an email.
Utilizing Your Dynamic Content Boxes (A.K.A – Dynamic Content Tags)
As previously mentioned, I set up a email template, in which I will insert my dynamic content tags. You can either use one of your existing campaigns or create a new one.
I am going to open up the campaign template I set up beforehand. Therefore I will go to the Email Campaigns tab > View Email Campaigns and edit my email campaign.
Once you are in the email editor, place your cursor where you wish to insert your dynamic content tag and click the Dynamic Content… drop-down menu that is located to the far left, just under the campaign editor. From the drop-down menu, select Insert a Dynamic Content Tag…
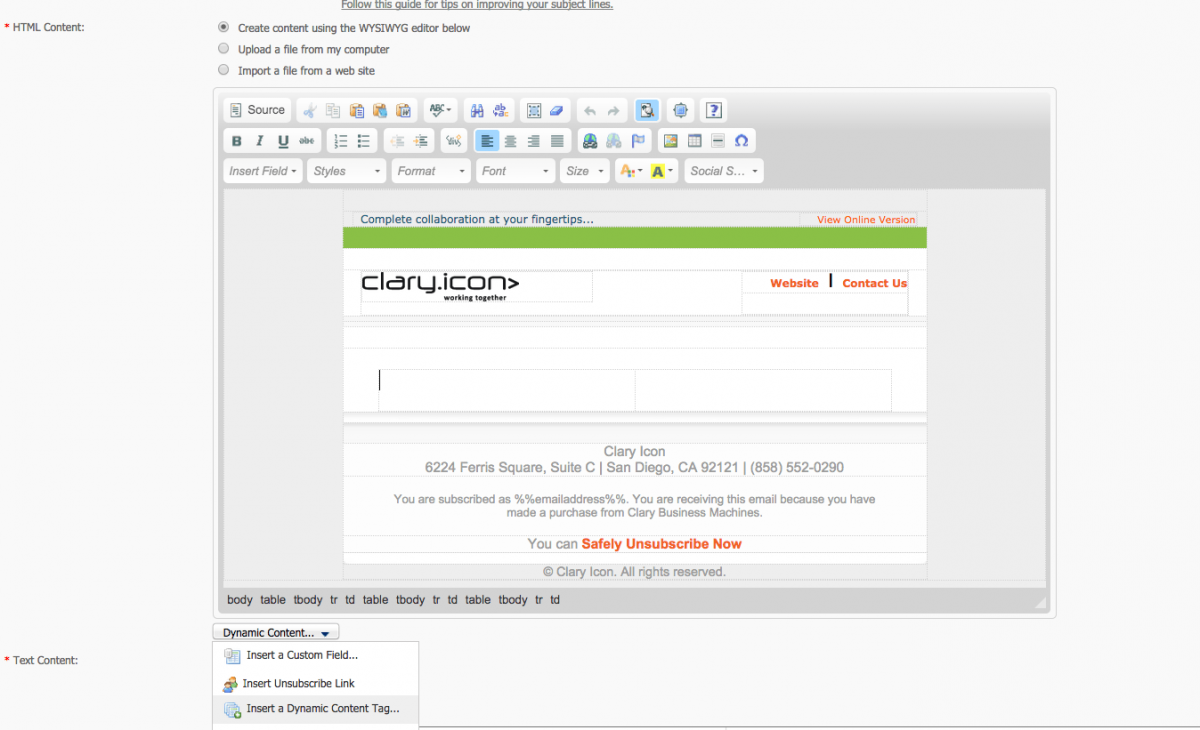
The Insert a Dynamic Content Tag… pop-up window appears, and your existing dynamic content tags will be listed for selection. Select the one you wish to insert by clicking on it. You have to repeat this for each dynamic content tag. Once you do this, the code for each dynamic content tag is inserted into your campaign – designating the location of your dynamic content tags.
Your dynamic content tags are now inserted into your campaign and will be populated when your campaign is sent out. Click Save and Exit. Now your email campaign is ready to send.
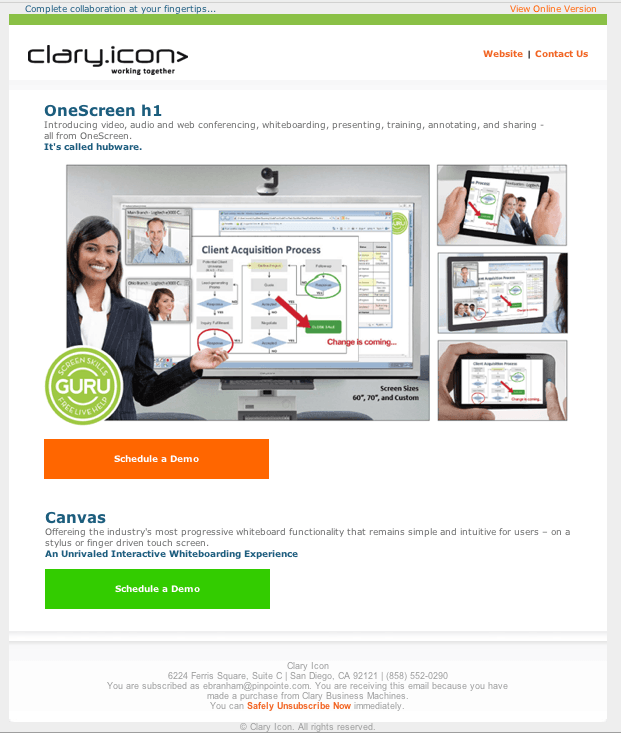
See the Final Send Result
To a subscriber who checked YES to both “Interest – OneScreen” and “Interest – Canvas”
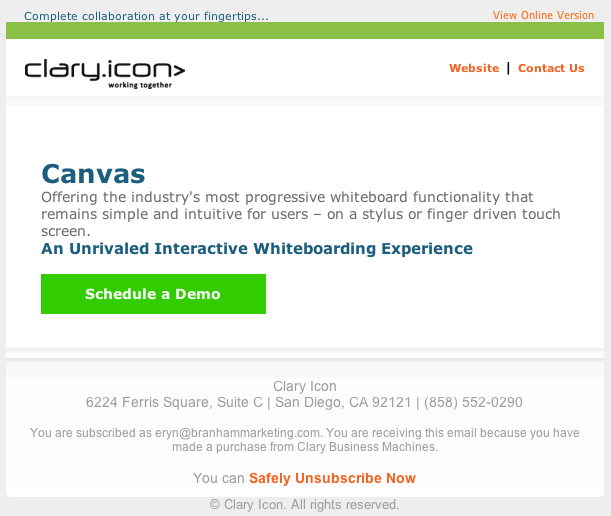
To a subscriber who checked YES to only “Interest – Canvas”
If you need help setting up dynamic content, please reach out to our awsome support team at support@pinpointe.com.